Bosch Super Graphic
Round white cake topped with dried fruit.

How to Dry Fruit for Cake Decorations

Submitted by Karen Rutherford - @cakedecorist.com

A new baking trend sees cakes with unique and fascinating designs. Of these designs, one of the most popular cake decorations are dehydrated fruits. This is because dried fruits give you a colorful, yet elegant appearance on your cake. Dried fruits are simple to make, and you can make many different colors and flavors.

Compared with fresh fruits, you can store dehydrated fruits made with the Filterpro food dehydrator for months. So whenever you feel like baking a cake, you can grab that jar of homemade dried fruits sitting conveniently on your shelf. 

Fruit is versatile in your cake construction. It can cover the curves of a cake with pretty designs, be a much crispier and sweeter option that adds flavor to your cake. So, dehydrated fruits as cake decorations are not only for aesthetics but also they are undeniably delicious to eat. 

Fruit cakes with candied fruit are the ideal recipe for this upcoming holiday season. It is spicy, hearty, and delicious (not to mention, the fruits come in one convenient package for everybody to enjoy)!

slices of orange grapefruit and strawberry with cherries.
Dried pears, oranges, bananas, and strawberries laying on a counter.

What you will need:

Ingredients

  • 1 cup water (100 grams)
  • 1pc lemon 
  • 1 cup sugar (100 grams)
  • 1pc orange
  • 8-10pcs strawberries
  • 4pcs kiwis 

Equipment

  • Dehydrator
  • Dehydrator trays
  • Saucepan
  • Mandoline slicer
  • Airtight container

Step by Step Instructions:

Step 1

Start by making a simple syrup, put a cup of water and a cup of sugar in a saucepan and bring to boil, then turn it off.

Step 2

Using a mandoline slicer, cut the orange, lemon, kiwi, and strawberries with a thickness of about 2 or 3 mm. You can also use a knife if you do not have a mandoline slicer.

Step 3

After cutting all your fruits, take out all the seeds and dip it in the syrup. Let it soak for five minutes and place the fruits into the dehydrator trays.

Step 4

Dehydrate it to 115º F (45˚C) for about six to eight hours.

Step 5 

Store in an airtight container.


Slices of orange arranged on a dehydrator tray.

Tips and Tricks:

You can store them in an airtight container for 2- 3 months, as long as you can keep it away from humidity.

Do not slice it too fine, because it will shrink after baking and drying it. Use a mandoline slicer for more precise shapes. Soaking the sliced fruits into the syrup helps remove the bitter taste of the fruits. 

Cooking time depends on the fruit that you are using, so it will vary on the thickness of the slices. Make sure to decrease the cooking time if you dehydrate the fruit to 65ºC, even though the fruit will lose some of its nutrients.

You can color your dried fruit by adding your desired color into the syrup where you will dip your sliced fruits before putting them into the dehydrator. After stacking and frosting your cake, arrange them on top of your cake overlapped with each other or cover your whole cake with dried fruits in layers.

Smiling woman

Cakedecorist

Karen Rutherford is founder and editor in chief at Cakedecorist. You will often find her in the kitchen creating edible works of art or trying out some new recipes. As a pâtissière and baking enthusiast, Karen has decided to share her abundant knowledge with the internet audience and provide only the best tips and recipes for baking and decorating your favorite sweets.


Bite size pieces of fudge on a plate.

Christmas Fudge

Product used - Mixer
  • 1-1/2 cups semisweet chocolate chips
  • 1 cup chopped pecans
  • 1/2 Tbsp vanilla
  • 1/2 cup butter
  • 2-3/4 cups sugar
  • 6 oz evaporated milk
  • Dash of salt
  1. Combine sugar, milk and a dash of salt in a large saucepan. Boil over medium heat for 3 minutes, the mixture reaches desired thickness, or to a temperature of 234 ℉. Stir occasionally. While syrup is cooking, place butter, chocolate chips and vanilla in mixer bowl.
  2. After sugar mixture is done, pour syrup into the chocolate and blend at low speed using the dough hook, then switch to medium speed for 10 minutes. Add in pecans during the last minute of mixing. Pour the fudge into an 8×8 pan lined with parchment paper. Chill until firm and then remove from the pan.
Chicken chili served in a blue bowl sitting on a dish towel.

Chicken Chili

Products used - Grain mill & mixer
  • 3 cups chicken broth
  • 1/3 cup white bean flour
  • 1 Tbsp vegetable oil
  • 1 cup frozen corn
  • 1 onion, chopped
  • 1 red bell pepper
  • 1 tbsp chili powder
  • 2 tsp cumin
  • 2 chicken breasts, shredded
  • 1 cup salsa
  • 1 cup water
  • 2 cans white beans
  • Cheddar cheese

Instructions:

  1. Shred cooked chicken using mixer and cookie paddles. Add beans to Harvest mill and grind into flour.
  2. Heat oil in a soup pot over medium-high heat. Add corn, pepper, onion, chili powder, and cumin. Cook for 2 minutes. Stir in the chicken.
  3. Add chicken broth and bean flour. Simmer on low until thickened.
  4. Stir in salsa, water and beans and bring to a boil. Reduce to low and cover and cook for 10 minutes.
A loaf of challah bread on a cookie sheet.

Challah Bread

Product used - Mixer
Bread Dough:
2¼ tsp. dry yeast 
1 cup warm water
1 egg
1/3 cup honey
2 tbsp. oil
1 tsp. salt
4 ½ cups flour, more or less if needed
Egg Wash:
1 egg
1 Tbsp water
1/2 tsp salt
Directions:
  1. Add yeast, water, egg, honey, oil, salt, and 1 cup flour to mixer bowl. Mix until combined, then add the rest of the flour slowly until dough no longer sticks to the sides of the bowl. Knead with the dough hook for 10 minutes.
  2. Cover the dough with plastic wrap and let rise until double, about 1 hour.
  3. Cut the dough into three pieces and roll into long strands. Braid the strands into a nice loaf shape. Place on a lightly greased pan and let rise for another 30 minutes.
  4. Brush braid with egg wash and sprinkle with poppy seeds. Bake at 375° F for approximately 35 minutes or until golden brown on top.
 
Blobs of divinity candy spaced out evenly on a cookie sheet.

Peppermint Divinity

Product used - Mixer & Food Processor
Peppermint Divinity
2 cups white sugar
1/2 cup light corn syrup
1/2 cup water
Dash of salt
2 egg whites
1 tsp vanilla
Candy canes
 
  1. Mix sugar, corn syrup, water and salt over medium heat in a medium sized saucepan. Boil the mixture until it reaches 260 degrees F° on a candy thermometer or until a small amount of mixture dropped into ice water holds its shape, but flattens when pressed.
  2. Beat eggs whites on high until stiff peaks form. Continue beating while slowly pouring hot syrup into egg whites.
  3. Add the vanilla and beat mixture for 6-10 minutes, or until no longer glossy.
  4. Scoop mixture onto a sheet of waxed paper. Sprinkle with candy cane immediately after scooping.
  5. Allow divinity to harden for several hours, then place in an airtight container.
 
6 Layer Mediterranean Dip in a dish on a counter. Dip has hummus, tomatoes, cheese olives, sauces and cucumbers.

6 Layer Mediterranean Dip

Product used - food processor

Hummus:
1/3 cup tahini
2 Tbsp olive oil
1/2 tsp cumin
1/2 tsp salt
2 cloves garlic
1/4 cup lemon juice
1 15 oz can chickpeas, drained and rinsed
1 Tbsp cold water

Tzatziki:
1 cucumber, grated
1 3/4 cups greek yogurt
1 Tbsp olive oil
1 Tbsp dill
1/2 Tbsp lemon juice
1/2 tsp minced garlic

Dip:
1/2 cup feta cheese
15 Greek olives, sliced
10 oz grape tomatoes, halved
1 cucumber, diced
1 red onion, chopped (if desired)
Pita chips, for serving

Instructions:

Hummus:
Blend all ingredients, except chickpeas and water, in food processor.
Add the chickpeas and blend until smooth. Slowly add water until the desired consistency is reached. Set aside.

Tzatziki:
Shred zucchini with the shredder attachment. 
Add yogurt, oil, dill, lemon juice, garlic, and salt to food processor bowl. Pulse until well blended. Set aside.

Dip:
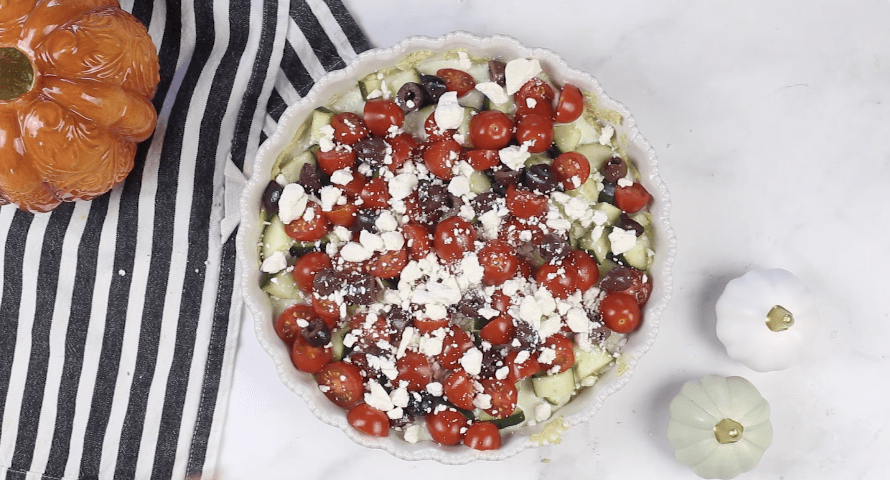
Spread hummus onto bottom of serving dish, then cover hummus with a layer of Tzasiki sauce.
Sprinkle with cucumbers, tomatoes, olives, red onion and cheese. 
Serve with Pita chips.

A package of Best Bread Dough mix laying on a dish towel with measuring cup.

How To Use The Best Bread Dough Mix

Let me introduce you to a new, top-secret ingredient: Best Bread Dough Mix.

Anyone that has been paying attention will know that I am not a baker- or a cook for that matter- and can seemingly mess up on an otherwise-perfect recipe.

While working for Bosch Mixers, I get the opportunity to test out new products. So, I got to try my hand at making bread with the new Best Bread Dough Mix. I made a batch in the Bosch Universal Plus, and another batch in the NutriMill Artiste. 

My husband was absolutely thrilled with the finished product. He said it was the best tasting bread ever, and exactly the way he likes it. I have to admit he gave me a few pointers to make it even more perfect. We tried it warm with butter, then with jam; we toasted it; we even dipped it in our soup!

Whether you’re a beginner baker or a professional bread artist, you will love this bread mix!

Drawings of flour, oil container, water in cup, and package of dough mix.

There is a level of knowledge and skill needed to make bread and get it perfect. Using this dough mix is a great way to learn without being intimidated. All you need is the dough mix, flour, water and oil. That’s it! Just add the dough mix to your ingredients, then place them into the mixer and turn it on. No need to prep anything. I followed the recipe exactly and it turned out great. That said, there are still some areas that you can perfect. 

Tip 1: The Bosch Mixer is an amazing mixer, and it will tell you when you’ve added enough flour. Instead of adding all of your flour at once, add it gradually cup by cup, with the mixer on speed 1-2. Continue adding flour until the bowl starts to clean. Then continue kneading on speed 2. The recipe does not need to be followed exactly, but you should add no more or less than one cup of flour.

Tip 2. Use the windowpane test to determine when the dough has been kneaded enough. Stretch a piece of the dough between your fingers, if it stretches and becomes somewhat translucent before tearing it’s done. If it tears then continue to knead for another minute or two. Shape and place into loaf pans, then let rise until the dough doubles in size.  

A package of Best Bread Dough mix laying on a dish towel with measuring cup.

You can order the Best Bread dough mix on our website under the consumables tab. An 18 oz. package will also be included with the Baker’s Pack. That’s enough to make 8 loaves of bread. I made one loaf, 9 rolls, and two sausage cheese rolls, with just half of my mix. 

This bread was fabulous, and can only get better with our little tweaks. Perfect your bread by practicing and making your dream loaves. Just remember, if I can make bread, you can make bread!

Best Bread Label

Best Bread 4 Loaf Recipe

Ingredients:

  • 1 1/4 Cup Best Bread Mix
  • 5 Cups Warm Water
  • 1/2 Cup Oil
  • 10-12 Cups of Flour

 Directions:

  1. Dissolve Best Bread dough mix into water and oil.
  2. Add half of the flour and begin kneading, adding more flour until dough pulls away from sides of the mixer. 
  3. Knead for 5-7 minutes in mixer or 15-17 minutes by hand.
  4. Let rise until doubled in size. 
  5. Bake at 350℉ for 35-40 Minutes.